Welcome to the Emergency Department…
Your role as the managing triage nurse is to accurately assess the patients who enter the waiting room, efficiently assign them to the appropriate nursing resources for care, and then manage admissions and discharges.
Overview
Let’s start by getting familiar with the layout of the application. When you start a new session, you will see a simplified abstraction of an emergency department waiting room and treatment rooms:
Let’s look at the basic components:
- Waiting Area: Patients who have arrived at the ER but have not yet been admitted to a treatment room will be shown in the waiting area. When you start the session, the waiting area is empty.
- Available RN Staff: This table lists the nursing staff that is available as well as their current workload. Nurse skill levels and work load are explained in more detail below.
- Treatment Rooms: Less critical patients (acuity levels 3-5) will be treated in one of the eight regular treatment rooms.
- Holding Area: If the ER becomes especially busy, it may be necessary to move less critical patients from a treatment room to the holding area, in order to admit a more critical patient. Patients who have been moved in such a way will be shown in the holding area.
- Trauma Rooms: More critical patients (acuity levels 1 and 2) will be treated in one of the four trauma rooms.
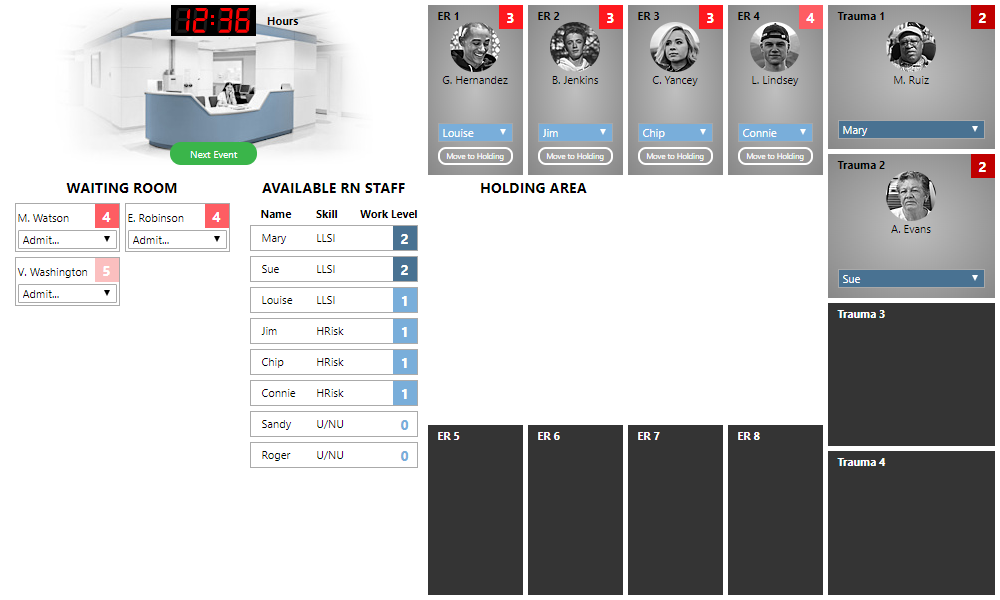
When you start, the ER is already half-filled to capacity. Treatment rooms 1–4 are occupied, as well as trauma rooms 1 and 2.
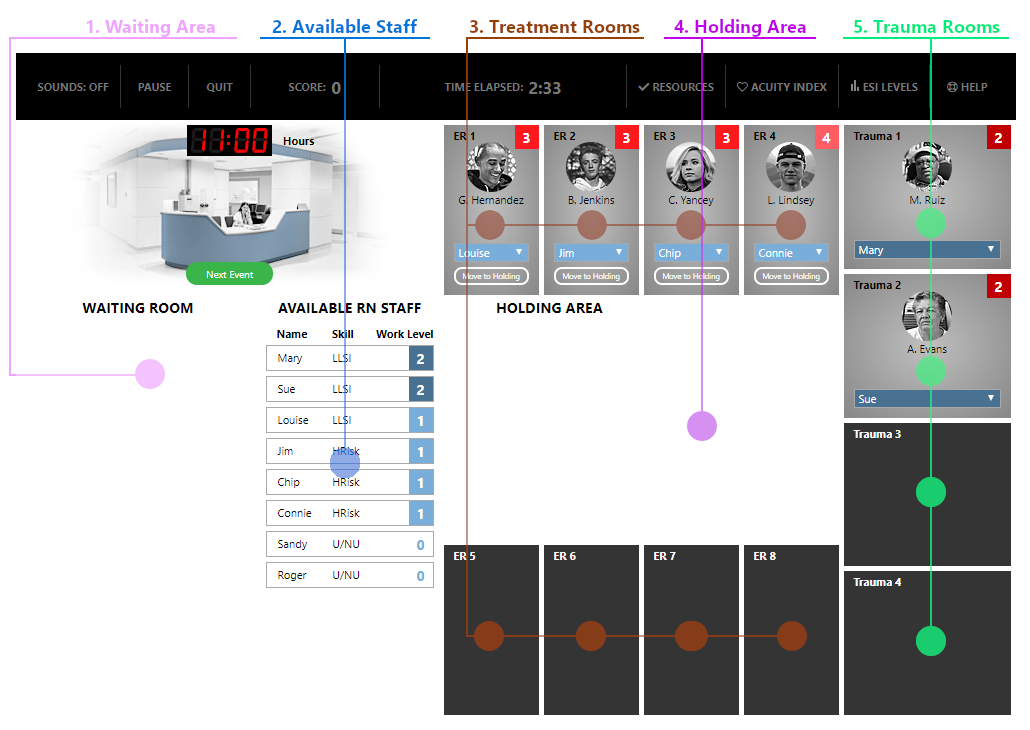
Treatment rooms
Let’s take a closer look at one of the treatment rooms:
 The name of the patient is listed along with a photo. The red box in the upper-right specifies the acuity of the patient. The nurse who is currently assigned to the patient is listed in the drop-down box below the patient name. (You can change this nurse assignment by selecting a different nurse from the drop-down.) There is also a “Move to Holding” button in the regular treatment rooms, which will be explained below.
Acuity levels
Our ER utilizes the Emergency Severity Index (ESI) triage algorithm to efficiently treat patients and assign the appropriate nursing resources. The acuity levels are defined as:
-
Acuity One: Life/Limb Saving Interventions (LLSI)
Pulseless / Apneic
Intubated / Unresponsive -
Acuity Two: High Risk
New onset of: Confusion / Lethargy / Disorientation Experiencing severe pain / Distress
-
Acuity Three: Urgent
(Many resources needed)
-
Acuity Four: Non-Urgent
(One resource needed)
-
Acuity Five: Non-Urgent
(No resources needed)
If you need to be reminded of these ESI Level definitions, you can click on the “ESI Levels” button at the very top of the screen, in the menu options.
Arriving patients into the waiting room
Let’s go ahead and introduce some new patients into the ER. To do so, click on the green “Next Event” button next to the waiting area. When you do, several things happen:
- Two to five new patients enter the waiting room.
- The clock in the top-left advances
- A determination is made as to which of the currently-treated patients are ready for discharge or inpatient transfer.
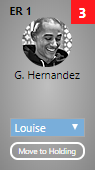
After we click the “Next Event” button for the first time, the waiting room contains three patients:
The first thing to do is assign an appropriate acuity to each patient. As you hover your mouse over a patient, a pop-up describing the patient condition and complaint will appear. Using this information, select an appropriate acuity from 1-5 from the “Select acuity...” drop-down box. If you need help, you can click the “Acuity Index” button at the top of the screen (in the menu bar) to go through the steps of the ESI algorithm.
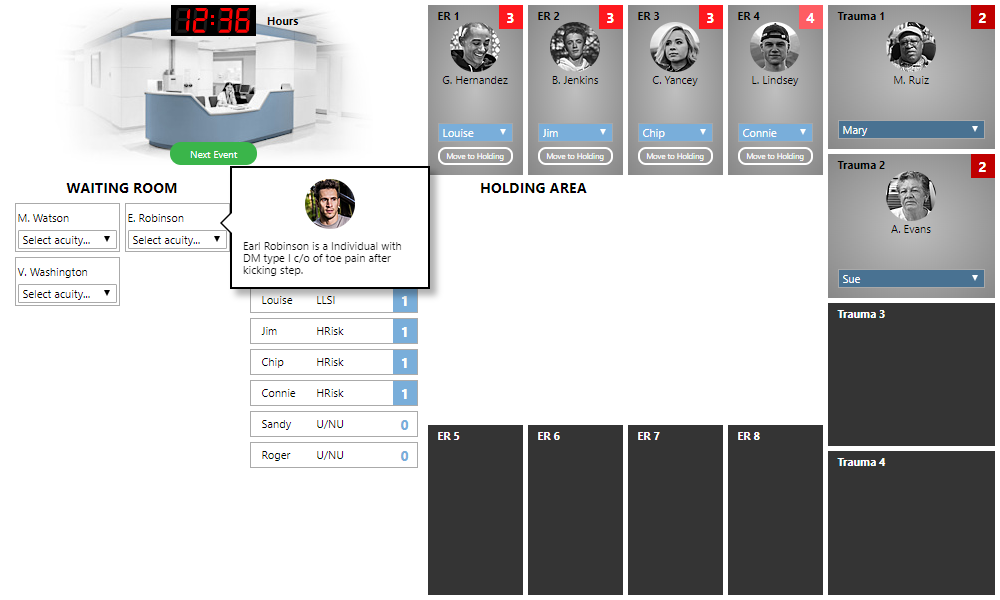
Once you select an acuity, you will get immediate feedback as to whether your selected acuity was correct or not:
You can close the feedback message using the “X Close” link in the bottom-right, or click elsewhere to dismiss it.
Assigning nurses to patients
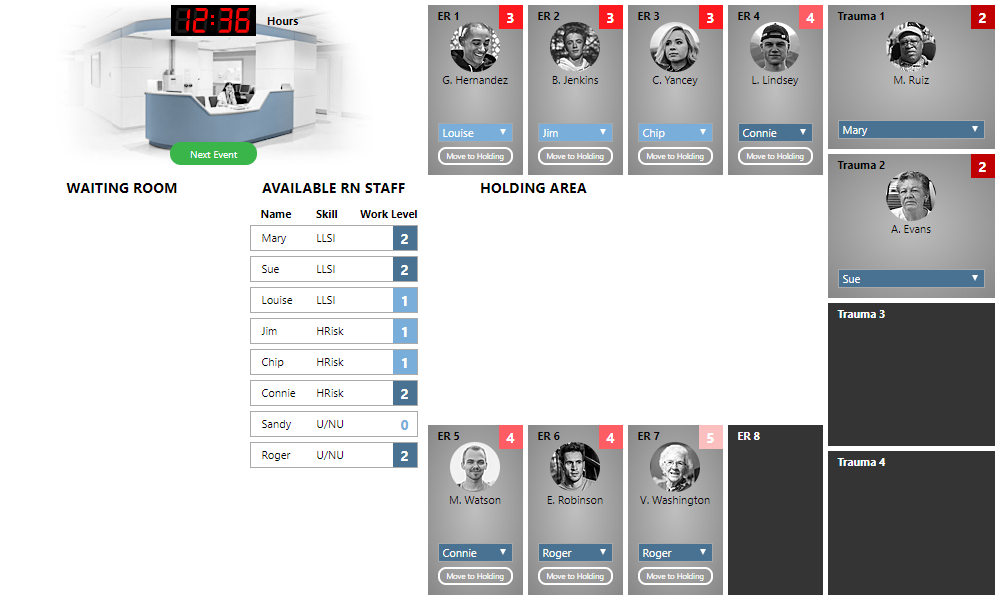
After you have assigned acuity to all the patients in the waiting area, you need to assign each patient to an appropriate room and nursing resource, if available. Here is what the ER looks like after we have assigned acuities to each patient:
The “Available RN Staff” table lists three skill levels of nurses:
- LLSI – These are your most highly-skilled and experienced nurses. They can handle a patient of any acuity level.
- HRisk – These nurses can handle any patient with an acuity greater than 1.
- U/NU – These nurses can handle patients with acuities 3–5.
Each nurse also has a “Work Load” listed. The work load is a measure of the capacity of a nurse to safety and effectively treat patients. Each nurse has maximum work load of 3. Work load is based on the acuity of the patients for whom the nurse is responsible:
- Patients with acuity 3-5 add 1 to a nurse’s work load.
- Patients with acuity 2 add 2 to a nurse’s work load.
- Patients with acuity 1 add 3 to a nurse’s work load.
With this information, we can assign patients from the waiting room. The most critical patients need to be taken care of first. Looking at our patients, “M. Watson” and “E. Robinson” are our most critical patients, with an acuity of 4. Any of our nurses are capable of treating these patients; they have both the skill level and work capacity. Let’s assign M. Watson to Connie by selecting “Connie” in the “Admit…” drop-down for “M. Watson”.
When we do so, the patient is automatically assigned to an appropriate room (“ER 5” in our case). You do not need to assign the specific room—the simulation will automatically put the patient in the next available room that is appropriate for the acuity level.
We have two patients remaining, with acuities 4 and 5, and three treatment rooms available. We can assign these to any available nurses, starting with the acuity 4 patient and working to the less critical patients. Once we do so, our waiting room is empty:
We are ready to receive the next set of patients into the waiting room, so we click the “Next Event” button. Four new patients arrive this time, and we assign appropriate acuities to each:
Discharging patients
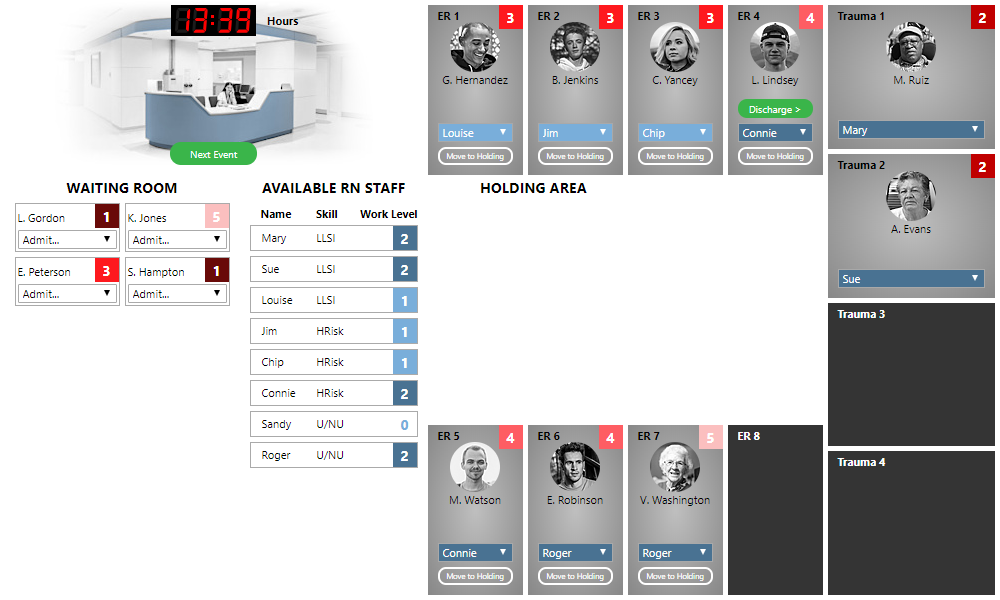
We have two patients with acuity 1, which require an LLSI nurse and add 3 to a nurse’s workload. There are no such nurses available. Let’s free up Louise by transferring care of "G. Hernandez" to Roger. (Click the blue drop-down below the patient's name and select the new nurse.) Then we can assign “L. Gordon” to Louise.
We need to free up Mary or Sue. To do so, we can transfer care “M. Ruiz” to Jim, who—as an HRisk nurse—is qualified to care for acuity-2 patients. Then we can assign “S. Hampton” to Mary.
This just leaves “K. Jones” (acuity 5) and “E. Peterson” (acuity 3). We take care of “E. Peterson” first, assigning him to Sandy. But now we have no more rooms available.
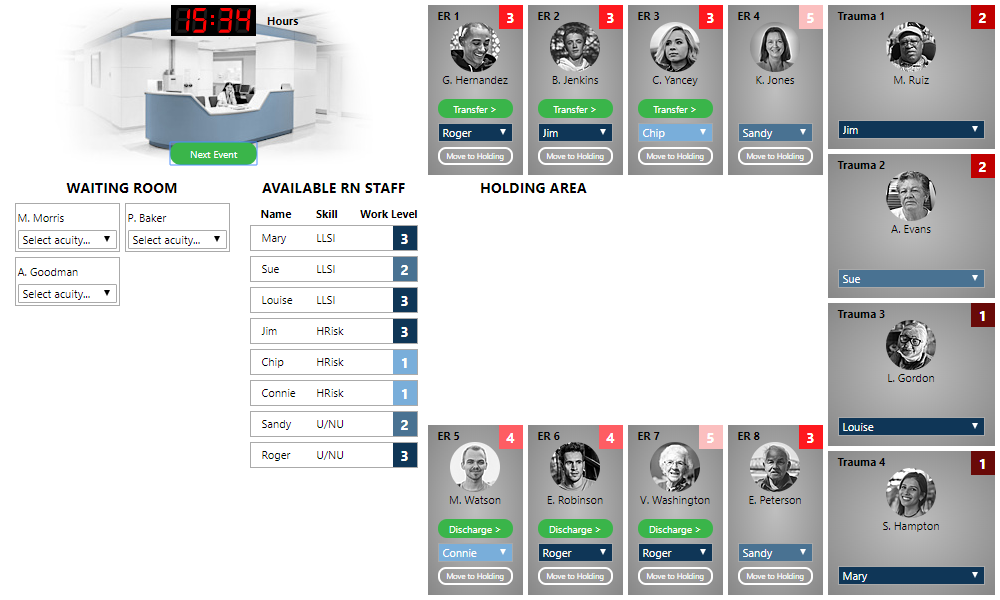
Note, however, that a new “Discharge” button has appeared in the room of L. Lindsey. This lets us know that the patient is ready for discharge. Clicking the “Discharge” button frees up the room (and reduces the work load of the nurse who was assigned), allowing us to admit another patient. Let's admit K. Jones. This clears out our waiting room once again. We click the “Next Event” button to receive new patients into the waiting room. After all of this, our ER looks like the following:
This time several patients are ready for discharge or transfer. Patients with acuity of 4 or 5 are discharged from the ER. Patients with acuity 1-3 are transferred to an inpatient bed. We’re going to take care of the discharges and transfers before assigning acuity, to get a good idea of what rooms are available.
When you transfer a patient to an inpatient bed, you may receive the following message:
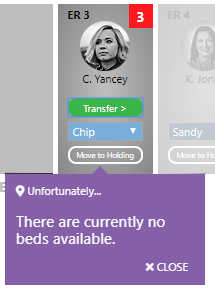
Rats ... no inpatient beds are currently available, so these patients need to stay in our ER for now. We will try later, after the next event.
Using the holding area
A few special circumstances may arise as you are making triage decisions. Suppose you find yourself in the following situation:
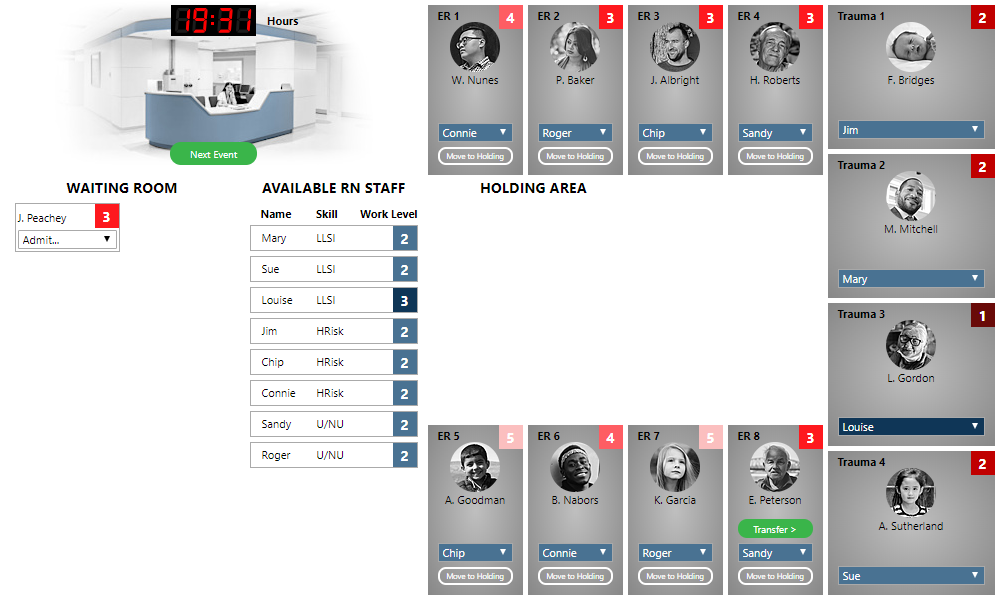
We are out of treatment rooms, but we still have a patient in the waiting room to admit. We have a patient ready for transfer, but there are no inpatient beds available. We could leave J. Peachey in the waiting room, but note that he (acuity 4) is more critical than K. Garcia (acuity 5), who is currently being treated.
The appropriate thing to do is to move K. Garcia to the Holding Area (by clicking the “Move to Holding” button), and then admit J. Peachey. After doing so, the ER looks like the following:
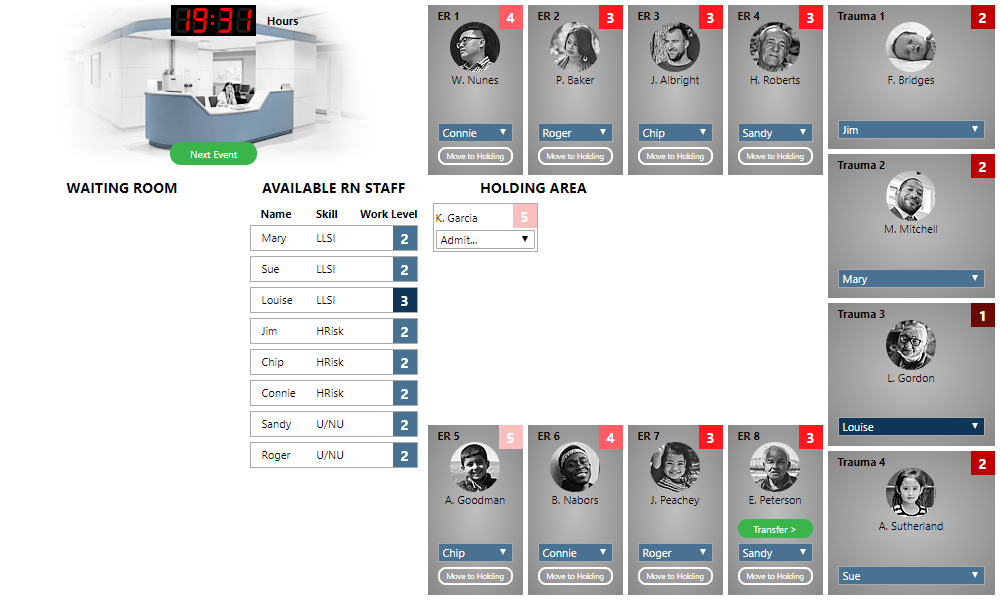
When a room again becomes available, we can assign a nurse to K. Garcia to return the patient to a treatment room and continue care.
Diverting patients
Another special situation concerns trauma room patients. Consider the following:

Our trauma rooms are full (and there are no inpatient beds available for transfer), but we have a patient with acuity 2 waiting for treatment. The patient needs urgent attention; it is not an option to leave them in the waiting room. Instead of selecting a nurse, you must select the “(Divert)” option from the “Admit…” menu to divert the ambulance to another facility. Your score will receive a penalty for this, so use this only as a last resort. Sometimes diverting a patient is inevitable, but it can usually be avoided by carefully and efficiently managing the workflow.
Menu bar
The menu bar at the top contains several elements:
- Sounds: ON/OFF This will toggle the background sounds that play while you are working through the session. These are intended to be distractions that make the simulation more challenging. They have no impact on your score.
- Pause: This will pause your session, stopping the time elapsed. You can continue from the pause screen when you are ready, or exit and resume at a later time.
- Quit: This immediately ends your session.
- Score button: This will give you a detailed breakdown of your score.
- The time that has elapsed for this session
- Resources: This lists the resources that are available for treating a patient. Referring to these can help you accurately assign acuity to patients.
- Acuity Index: Provides an interactive form to run through the ESI acuity algorithm to assign appropriate acuity.
- ESI Levels: Provides descriptions of the ESI acuity levels.
- Help: View this help document.
Finishing the session
We repeat this workflow (assigning acuity, assigning nursing resources, discharging/transferring patients) until a set number of patients have been processed, after which the simulation will finish.
When a set number of patients have been processed, the “Next Event” button changes to a “Get Final Score” button, which will take you to a page on which you can see a breakdown of your score.